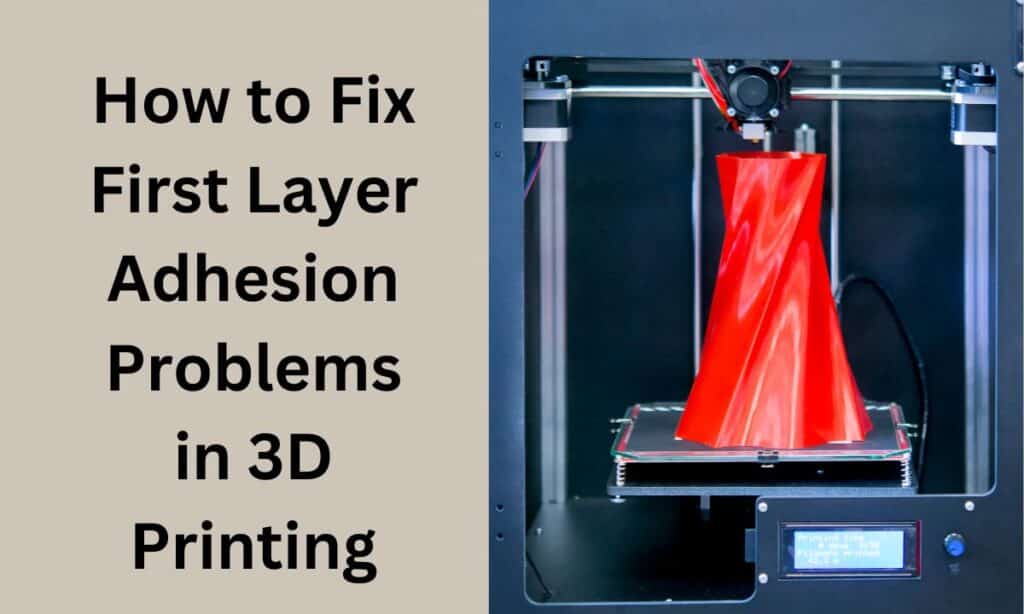
Struggling with the first layer not sticking to the print bed? You’re not alone. First layer adhesion issues are one of the most common problems in 3D printing, and even experienced users encounter them. Fortunately, with a few adjustments, you can achieve a strong, consistent first layer that sets the foundation for a successful print. Let’s explore how to troubleshoot and fix first layer adhesion problems.
Affiliate Disclosure
We participate in Amazon affiliate programs, earning fees from qualifying purchases via links at no extra cost to you. It’s how we keep this blog rolling and my 3D printers buzzing with fresh filament for reviews like this one!
Related: 3D Printing Tips: The Ultimate Janky Yet Effective Beginners Guide – Get more troubleshooting tips.
Why Does First Layer Adhesion Matter?
What Causes First Layer Adhesion Issues?
If you’ve experienced your 3D prints not sticking, you may wonder what’s causing the issue. Poor first layer adhesion usually results from an uneven print bed, incorrect bed temperature, or improper nozzle height. These factors make it difficult for the filament to stick to the bed, leading to curling or detached prints. Don’t worry—these problems are common and often easy to fix.
No Need to Stress Over Adhesion Problems
First layer adhesion issues are frustrating, but they’re usually solvable with a few adjustments. The key is understanding the science behind how filament bonds with the print bed and using this knowledge to create optimal conditions for your filament to adhere.
Scientific Explanation: Why the First Layer Doesn’t Stick
The first layer needs to bond well to the print bed to support the rest of the print. For adhesion to occur, the filament must make strong contact with the bed surface while cooling and hardening. If the nozzle is too far, the filament won’t press against the bed and will likely peel away. If it’s too close, the filament will be squished, causing uneven adhesion. Getting the right nozzle height, bed temperature, and surface preparation can make all the difference.
Related: Best Slicing Software for 3D Printing – Optimize slicing settings for better adhesion.
Practical Tips for Fixing First Layer Adhesion Problems
1. Level Your Bed
Leveling the bed ensures that the nozzle is at an even height across the entire bed, allowing the filament to stick properly. Here’s how to level the bed:
- Use the paper method: Place a piece of paper under the nozzle and adjust each corner until you feel slight resistance when moving the paper.
- Repeat across the bed: Level each corner and check the center to make sure the bed is level throughout.
2. Set the Correct Nozzle Height
The nozzle should be at a precise height from the bed, typically around 0.1-0.2 mm, depending on your filament and printer. Adjust the nozzle height so that the first layer is evenly deposited without being squished or floating above the bed.
- Use live leveling: Many 3D printers offer live leveling adjustments while printing the first layer, allowing you to fine-tune the height in real-time.
- Test and adjust: Print a small test object to check your nozzle height, making incremental adjustments until the filament sticks consistently.
3. Optimize Bed Temperature and Adhesion
Temperature and bed adhesion methods can greatly influence the first layer’s success.
- Increase the bed temperature: Most filaments have an ideal bed temperature that improves adhesion. For example, PLA sticks well at around 60°C, while ABS often requires a bed temperature of 100°C or more.
- Try different adhesion methods: Use adhesives like glue sticks, painter’s tape, or a PEI sheet, depending on your filament type. These surfaces provide extra grip and can make a noticeable difference in adhesion.
4. Clean and Prepare the Bed Surface
A clean surface is essential for good adhesion. Dust, oils, and debris can cause uneven bonding.
- Clean with isopropyl alcohol: Regularly wipe down the bed with isopropyl alcohol to remove oils and dust.
- Remove old adhesive: If you use glue or tape, clean off any buildup before starting a new print. Fresh adhesive can improve bonding and create a smooth surface for your filament.
Detailed Guide to Troubleshooting Adhesion Issues
Step 1: Check Bed Level and Nozzle Height
Leveling and nozzle height are the foundation of good adhesion. Ensure the bed is level across all corners and adjust the nozzle height until you achieve a gentle “squish” effect with the filament.
Step 2: Adjust Bed Temperature for Your Filament
Different filaments need specific bed temperatures to bond properly. Check your filament’s recommended bed temperature and make adjustments as needed.
Step 3: Experiment with Adhesion Methods
Not all beds provide equal adhesion. Experiment with using a PEI sheet, painter’s tape, or glue, depending on your filament type and printer bed.
Step 4: Clean the Bed Surface
If your bed isn’t clean, even the best settings won’t make a difference. Wipe down the bed with isopropyl alcohol to remove oils and dust that can interfere with adhesion.
Related: 3D Printer Maintenance – Maintain printers to prevent adhesion issues.
FAQs About First Layer Adhesion
Why won’t my first layer stick to the bed?
Common causes include improper bed leveling, incorrect nozzle height, and insufficient bed temperature. Ensuring these settings are correct can improve adhesion.
What’s the best bed temperature for PLA?
PLA typically adheres well at around 60°C. However, you may need to experiment with slight adjustments depending on your specific setup.
Can I use glue or tape to improve adhesion?
Yes, glue sticks, painter’s tape, and PEI sheets are popular methods to increase bed adhesion, especially for materials like PLA and ABS.
How often should I level the bed?
Leveling the bed should be done regularly, especially if you’ve moved the printer, changed the nozzle, or completed a large print.
Does bed cleanliness affect adhesion?
Absolutely. A clean bed free of dust, oils, and old adhesive creates an ideal surface for the first layer to bond effectively.
Conclusion
Achieving a strong first layer is key to a successful 3D print, and with a few adjustments, you can improve adhesion and reduce printing issues. By leveling the bed, setting the right nozzle height, adjusting bed temperature, and keeping the surface clean, you’ll be well on your way to a strong first layer every time. Remember, 3D printing often requires a bit of trial and error—don’t hesitate to make small adjustments and find what works best for you. Happy printing!
Related posts:
 How Far Should a 3D Printer Nozzle Be from the Bed?
  How Much 3D Printer Filament Do I Need? A Practical Guide
  How 3D Printer Filament Is Made: A Behind-the-Scenes Look
  Why Is My 3D Print’s Resin Mirroring or Prints Coming Out Reversed?
  5 Hidden Reasons Your Resin 3D Prints Are Failing – and How to Fix Them
  🚀Boost Your 3D Printing with Best FLASHFORGE Filaments of 2025!
  Best Affordable Bulk PLA Filament on Amazon for Stunning 3D Prints
  Comgrow SH02 Filament Dryer Box Review: Does it Really Work?
  Creality CFS Multicolor Filament System Review: Worth $319 in 2025?
  Best Silk PLA Filaments for Cosplay and Decorative 3D Printing