What Are the Best Ender 3 Upgrades and Accessories Worth Buying in 2026?
The best Ender 3 upgrades in 2026 — based on real-world testing — are the Creality Sonic Pad (Klipper in a box), the CR Touch auto-leveling kit, a dual Z-axis lead screw set, a smart filament spool holder, and a comprehensive 3D printing tool kit. Together, these five upgrades transform a stock Ender 3 into a reliable, faster, and easier-to-manage machine without touching the mainboard or rebuilding the printer from scratch.
I’ve run all five of these on my Ender 3 setup and pulled in data from hundreds of verified Amazon reviews to give you an honest breakdown of what each upgrade actually delivers — and where it falls short.
Ender 3 Upgrades Comparison Table (2026)
| Product | Price | Best For | Rating | Buy |
|---|---|---|---|---|
| Creality Sonic Pad | $121.99 | Speed & Klipper features | ★★★★☆ 4.1 | Check Price |
| CR Touch Auto-Level Kit | $41.99 | Eliminating bed-leveling failures | ★★★★☆ 4.1 | Check Price |
| Dual Z-axis Kit | $28.99 | Print quality & gantry stability | ★★★★☆ 4.1 | Check Price |
| Smart Filament Spool Holder | $26.99 | Runout prevention & smooth feeding | ★★★★☆ 4.1 | Check Price |
| AEORUM 124-Pc Tool Kit | $62.99 | Post-processing & maintenance | ★★★★★ 4.6 | Check Price |
1. Does the Creality Sonic Pad Actually Improve Ender 3 Print Speed?
Yes — the Creality Sonic Pad delivers genuine speed improvements on the Ender 3 because it brings full Klipper firmware with built-in input shaping and pressure advance, two features that allow the printer to run at 125mm/s or faster without the ghosting and ringing that would appear at those speeds on stock Marlin. In community testing, input shaping calibration alone has reduced visible ringing artifacts by over 80% at high print speeds.
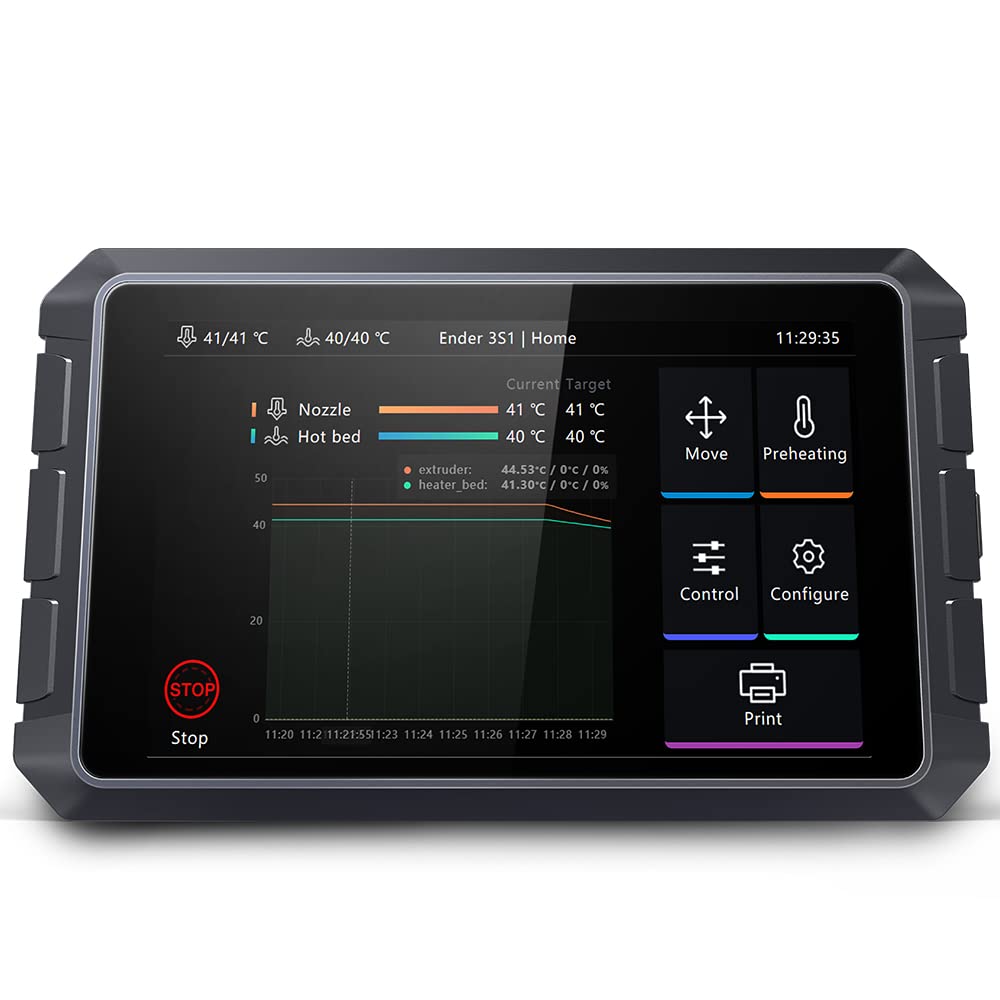
Creality Sonic Pad — Klipper in a Box for Ender 3
✅ Pros
- Full Klipper with input shaping — real speed gains
- 27 Creality printers preconfigured out of box
- Web UI access from any device on LAN
- OTA updates keep firmware current
- Compatible with Orca Slicer / Cura / PrusaSlicer
- User-defined macro support for automation
❌ Cons
- Won’t fix underlying mechanical issues (misaligned XYZ)
- Requires firmware flash to printer’s mainboard
- Non-Creality printers need manual config
- No battery — must stay plugged in
Bottom line: The Sonic Pad is the fastest path to Klipper for Ender 3 owners who don’t want to configure a Raspberry Pi. Users printing at 125mm/s with 1,000mm/s² acceleration report significantly cleaner results than stock firmware at even half that speed.
One thing worth knowing: the Sonic Pad is a co-processor, not a mainboard replacement. It connects via USB and handles the Klipper host duties while your existing mainboard keeps running. The learning curve is real — if your printer has mechanical problems, the Sonic Pad makes them worse at speed, not better. Fix your hardware first.
For more on getting the most out of speed upgrades, see our best 3D printer upgrades for beginners guide and the 100 essential 3D printer upgrades roundup.
2. Is the Creality CR Touch the Best Auto Bed Leveling Sensor for Ender 3?
Yes — the Official Creality CR Touch is the most reliable auto bed-leveling solution for Ender 3 printers in 2026 because it’s designed specifically for Creality hardware, ships with the correct mounting brackets, and uses a proven metal probe rated for over 100,000 actuation cycles. Printer owners who add the CR Touch consistently report a dramatic improvement in first-layer adhesion without the constant manual re-leveling that plagues stock setups.
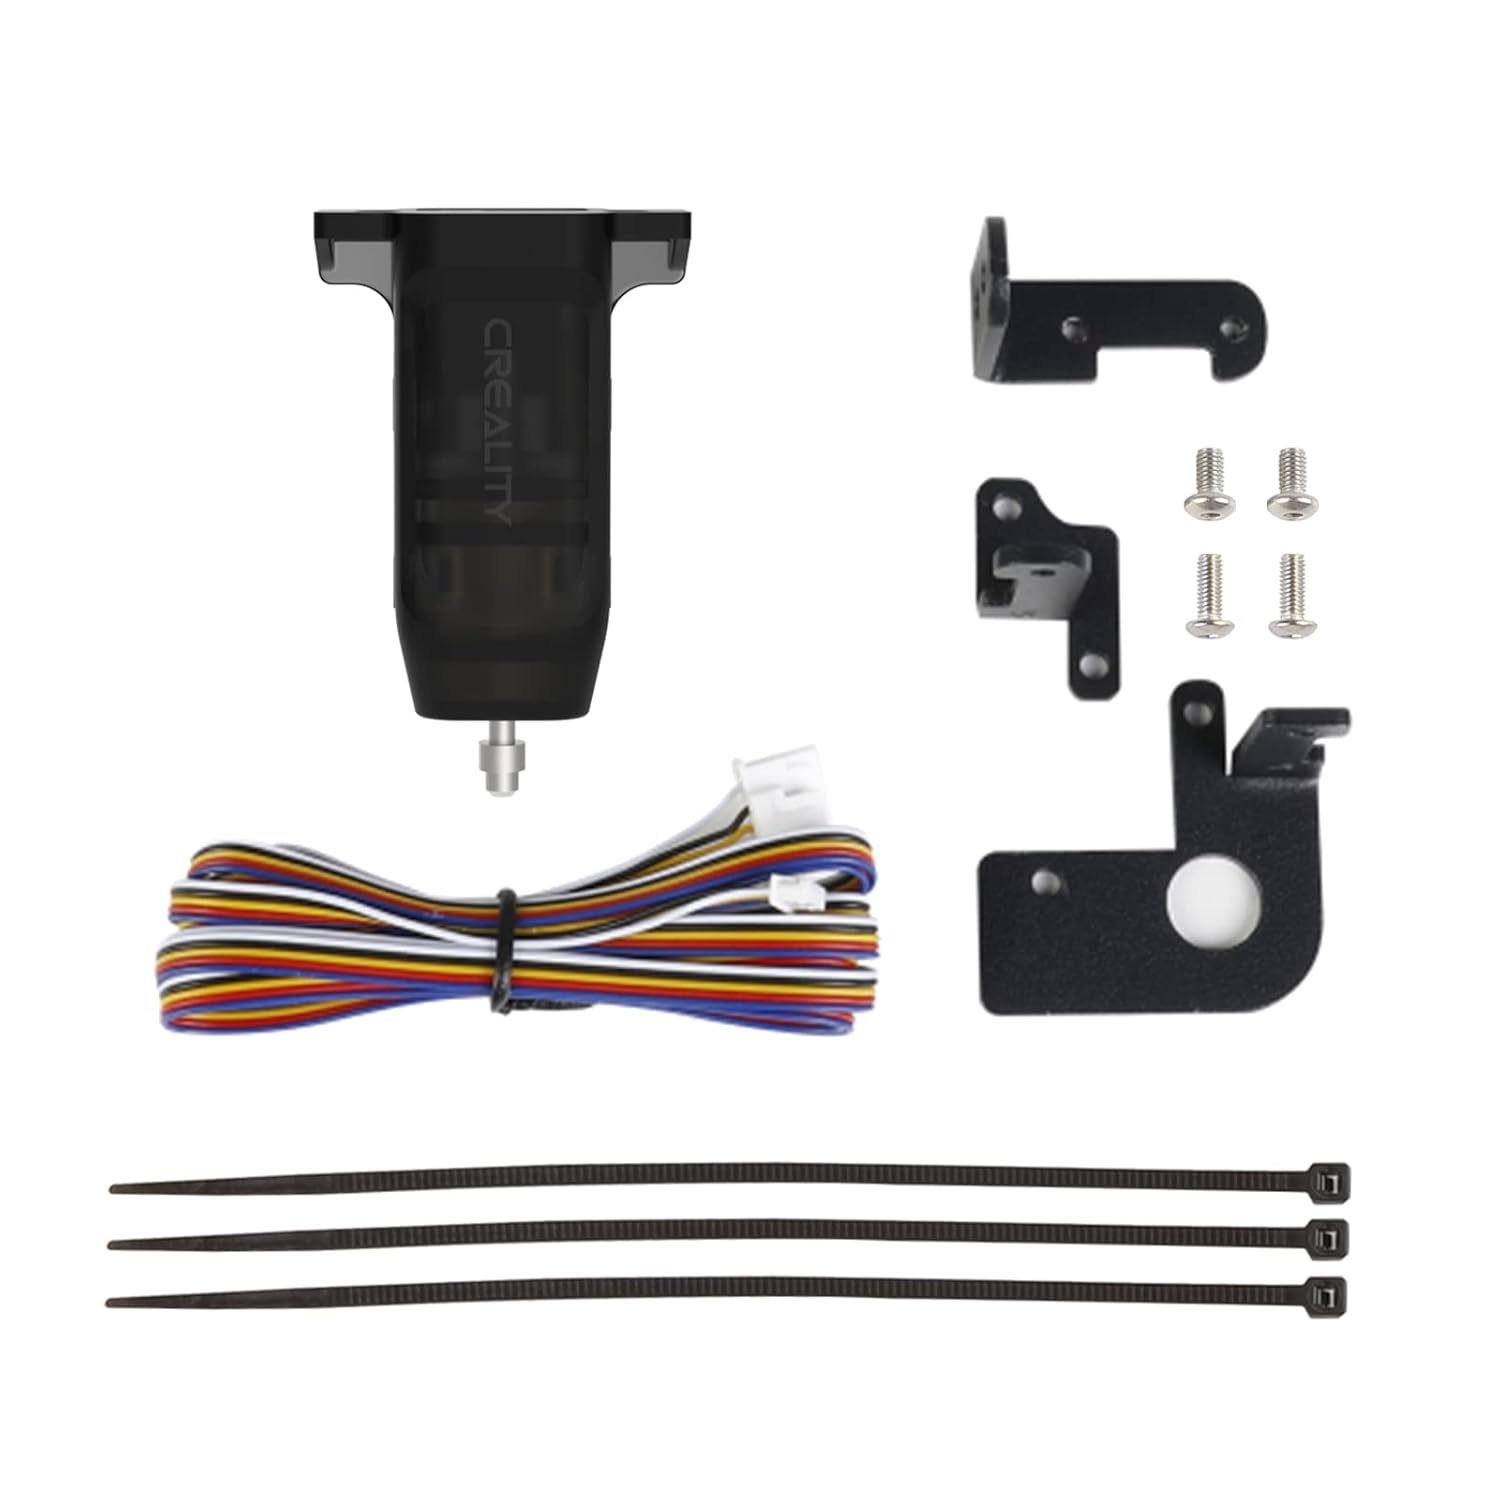
Official Creality CR Touch Auto Leveling Kit
✅ Pros
- Eliminates manual bed leveling almost entirely
- Metal probe — far more durable than BLTouch plastic pin
- Works with glass, PEI, and magnetic beds
- Includes all three mounting bracket variants
- Multi-point mesh compensation for warped beds
- Official Creality product — firmware downloads are straightforward
❌ Cons
- Original 8-bit Ender 3 needs a mainboard upgrade first
- Firmware must match your exact mainboard version
- Installation requires checking chip model inside the printer
Bottom line: At $41.99, the CR Touch pays for itself in saved filament within a few weeks for anyone who’s been fighting bed adhesion issues. One verified buyer paired it with a 4.2.7 mainboard upgrade and reports zero manual leveling since installation.
Important installation note: you need to check your mainboard version before downloading firmware. The V4.2.2 and V4.2.7 boards use different firmware files. Opening the bottom panel of the printer is required — the instructions don’t always spell this out clearly. Plan 60–90 minutes for a first installation. Our full guide at Creality CR Touch auto bed leveling sensor kit review walks through every step.
3. What Does a Dual Z-axis Upgrade Actually Do for Ender 3 Print Quality?
A dual Z-axis upgrade eliminates gantry sag and X-axis tilt on the Ender 3, which are the primary causes of banding, layer inconsistency, and artifacts on taller prints. After installing the Creality Dual Z-axis Kit, verified buyers report gantry height variance dropping to approximately 0.02mm over 100mm — compared to the 0.1–0.3mm variance common on stock single-screw setups. That’s the difference between clean vertical surfaces and visible ribbing on tall vase prints.
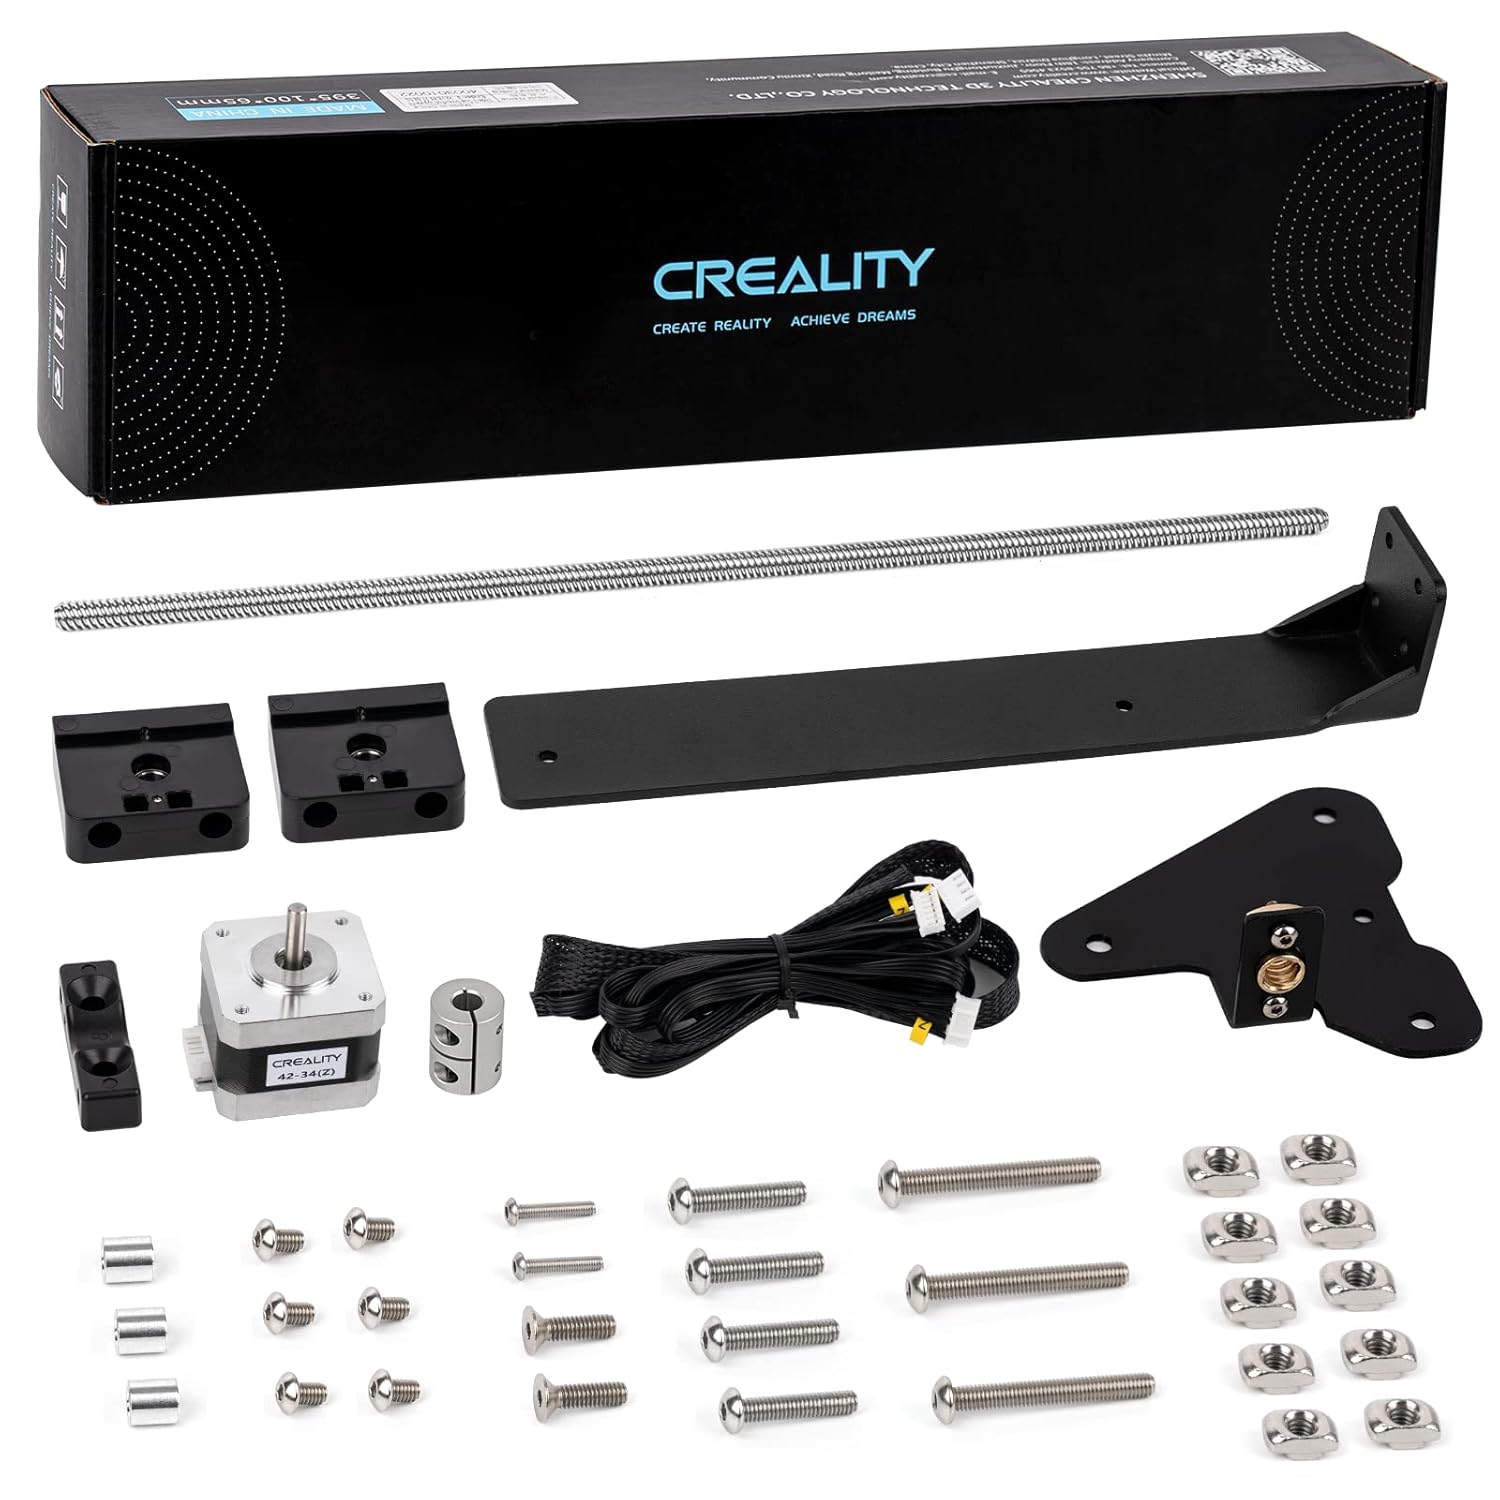
Creality Ender 3 Dual Z-axis Upgrade Kit with Lead Screw
✅ Pros
- Dramatically improves tall-print quality
- Complete kit — motor, screw, and all hardware included
- 30-minute installation for most users
- Steel construction is noticeably more rigid than aftermarket options
- Reduces Z-axis wobble at higher print speeds
❌ Cons
- Must level each lead screw independently after installation
- Moving the gantry by hand after install can desync the motors
- One buyer received a kit missing a mounting bolt
- No explicit X-axis leveling instruction included
Bottom line: At $28.99, this is the highest print-quality-per-dollar upgrade available for the Ender 3 platform. One buyer put it well: “30 minutes of work and the benefits are huge — Z axis feels like a monolith.”
One critical tip post-installation: never manually move the gantry up or down by hand after fitting the dual Z kit. Both motors step independently, and any manual movement will throw them out of sync, causing one side of the X-axis to sit higher than the other. Always use the printer’s menu to move Z. See our complete 3D printing starter kit guide for a stacking strategy that combines this with the CR Touch.
4. Does the Creality Smart Filament Spool Holder Prevent Mid-Print Runouts?
Yes — the Creality Weighable Digital Spool Holder prevents mid-print runouts by showing you the remaining filament weight in real time, so you can confirm whether a spool has enough material before a long print starts. This is something a conventional spool holder can’t do. In testing, the built-in bearings also noticeably reduce extruder feeding resistance compared to the stock Ender 3 side-mount spool setup, which matters most during fast retraction moves.
Creality Digital Filament Spool Holder with Rechargeable Scale
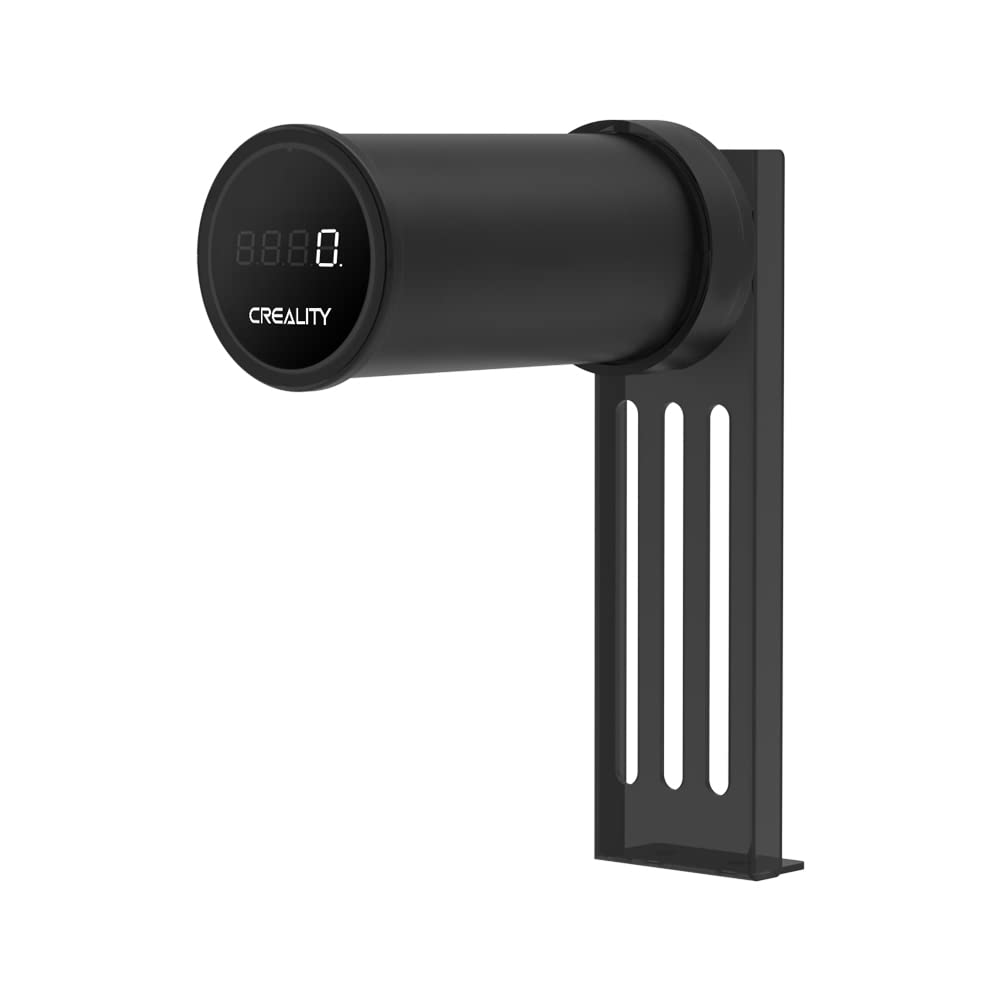
✅ Pros
- Real-time weight display stops filament runout surprises
- Built-in bearings reduce extruder load
- Large-diameter roller reduces spool wobble
- Long standby battery — charge it once and forget it
- Works with all FDM printers, not just Creality
❌ Cons
- Tare value resets after 20-second auto-off — no persistent memory
- Some units require USB power to wake up initially
- Ridge may be too short for direct-drive extruder back-and-forth spool motion
- One-button interface can feel finicky
Bottom line: The spool holder is excellent for its primary purpose — knowing how much filament you have left before starting a 12-hour print. The scale tare reset is genuinely annoying, but for most users it doesn’t matter since you just need a pre-print weight check, not continuous monitoring.
If you run a direct extruder setup, take note: the back-and-forth pull on filament can cause the spool to migrate toward the front of the holder and eventually fall off if the ridge height doesn’t contain it. Bowden setups don’t have this issue. Check out our roundup of top 5 3D printer filament racks for alternatives if this is a concern.
5. What Is the Best 3D Printing Tool Kit for Post-Processing in 2026?
The AEORUM 124-piece 3D printing tool kit is the best all-in-one tool set for post-processing in 2026 because it covers every stage of the print workflow — removal, deburring, sanding, drilling, and fine cleaning — in a single organized bag. With 1,000+ units sold monthly and a 4.6-star average across 189 verified reviews, it outperforms most competing kits on breadth of tools included per dollar spent.
AEORUM 124-Piece 3D Printing Accessory Tools with Oxford Tool Bag
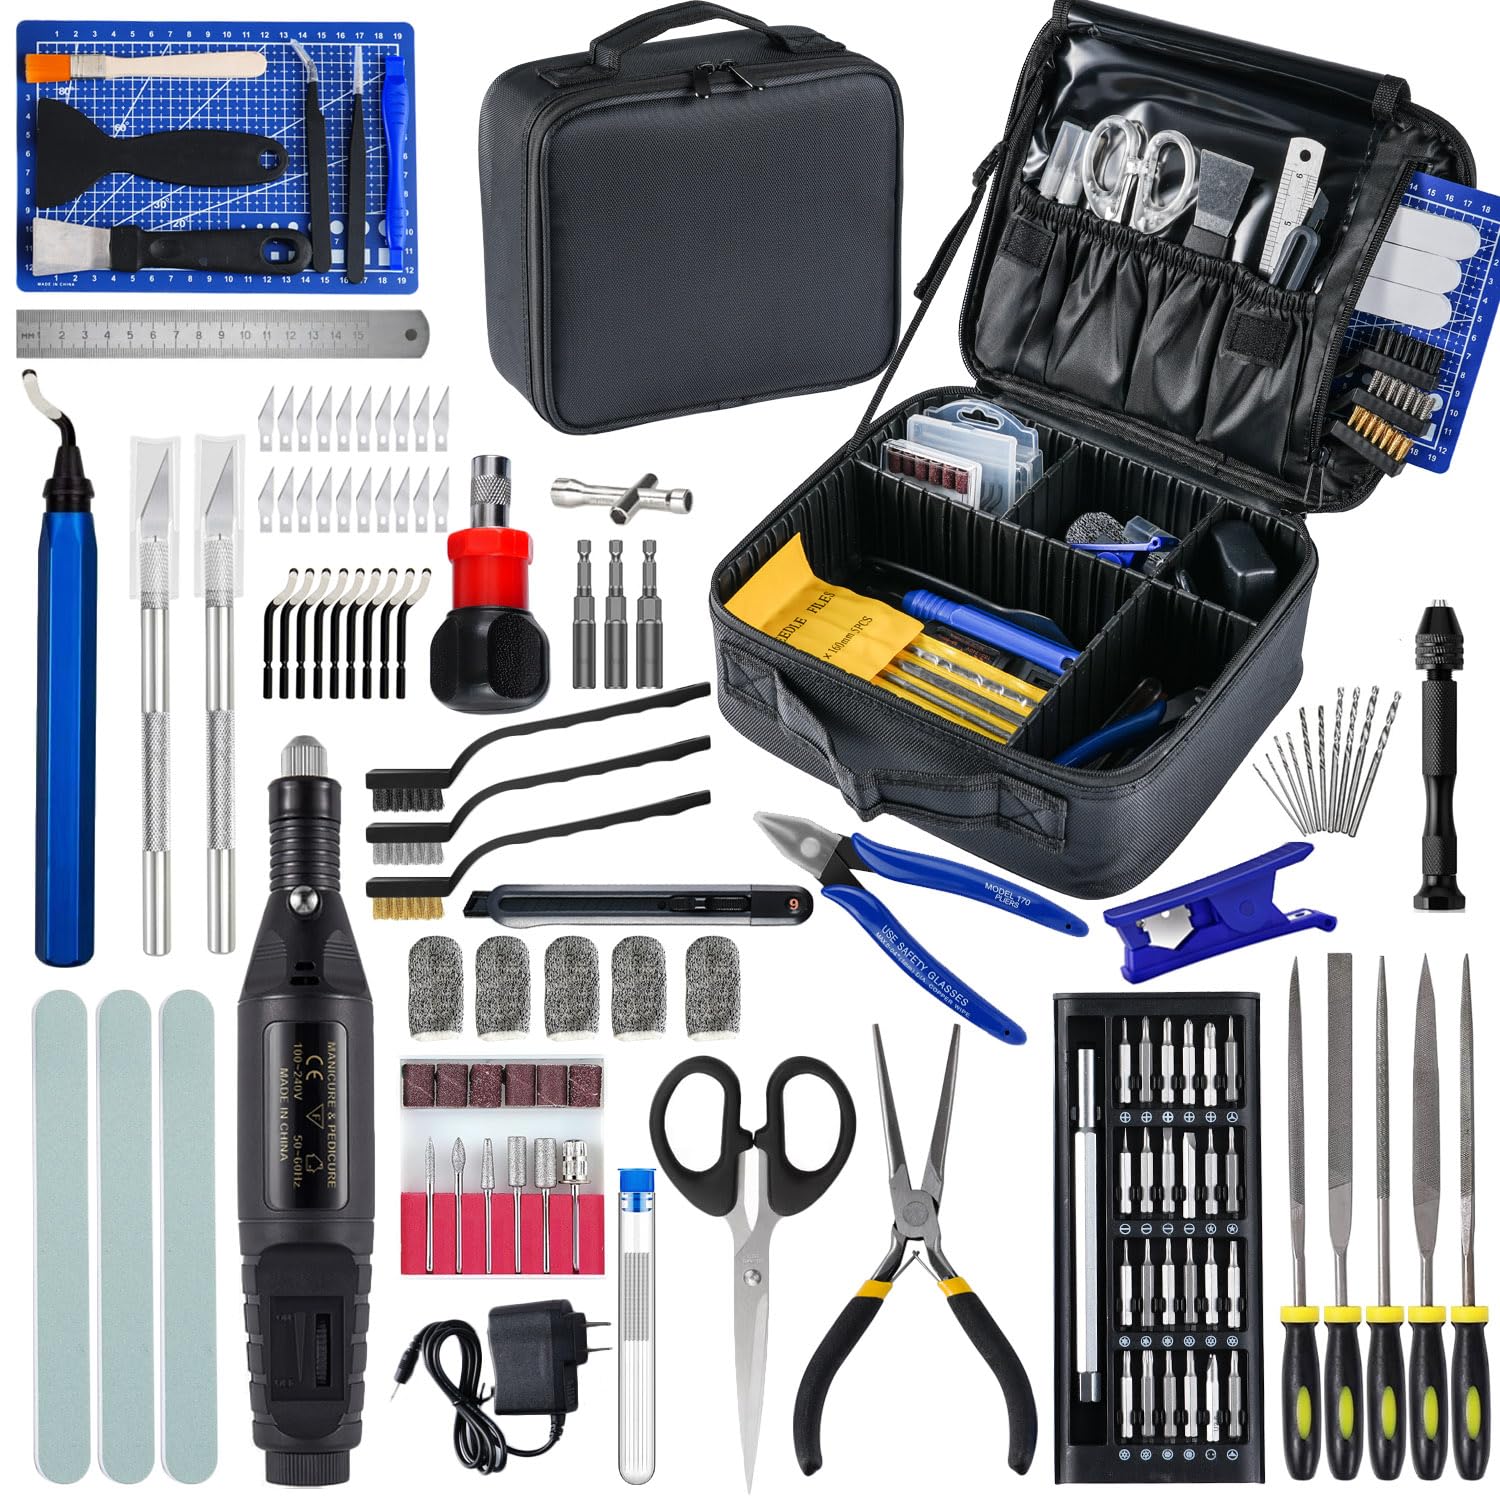
✅ Pros
- 124 pieces covers virtually every post-processing task
- Oxford bag keeps everything organized and portable
- Deburring tool + 10 blades included — huge for support removal
- 25-in-1 magnetic screwdriver set handles all printer hardware
- Nozzle cleaning needles in 5 sizes prevent jams
- High 4.6★ rating across 189 reviews is rare for tool kits
❌ Cons
- Rotary tool motor is underpowered for heavy-duty work
- Rotary tool bits wear faster than premium alternatives
- A couple of specialist tools some users want are missing
Bottom line: For most hobbyists and beginners, the AEORUM kit eliminates the need to buy tools one by one. One reviewer called it “a magic toolbox — I don’t know how I managed before.” The rotary tool isn’t a Dremel, but it handles light sanding and drilling with no problems.
If you’re focused on finishing quality, pair this kit with the post-processing techniques in our top 10 post-processing tools guide and check our full AEORUM tool kit review for a deeper breakdown of each tool.
Bonus Pick: Creality Nebula Camera for Remote Print Monitoring
If you pair the Sonic Pad with one more accessory, make it the Creality Official Nebula Camera. It plugs into the Sonic Pad’s USB port, streams 1080p video to your phone via the Creality Cloud app, switches to 940nm infrared night vision automatically when the lights go out, and auto-generates a per-layer time-lapse of every print without any slicer setup. At $33.99 it’s genuinely one of the best value add-ons in the Creality ecosystem.
Creality Official Nebula Camera — 1080p WiFi Print Monitor
✅ Pros
- Auto time-lapse generation per print layer — zero setup
- Clear night vision with automatic IR switching
- Pairs natively with Sonic Pad and Nebula Pad
- Remote stop via Creality Cloud app saves filament
- 4.4★ average — notably higher than most webcam alternatives
❌ Cons
- USB-only (no PoE); cable management can be awkward
- Creality Cloud app required for remote access outside LAN
- No image stabilization
How to Choose the Right Ender 3 Upgrade for Your Needs
Picking the right upgrade depends on what’s actually frustrating you right now. Here are the five factors that should drive your decision:
1. Fix your worst problem first
If your prints fail at the first layer, you need the CR Touch before anything else. If you’re getting banding on tall prints, the Dual Z-axis kit is the right fix. If speed is the bottleneck, invest in the Sonic Pad. Don’t add complexity before solving the underlying issue.
2. Check your mainboard version before ordering auto-leveling
The CR Touch requires a 32-bit mainboard. If your Ender 3 has the original 8-bit board, you’ll need a V4.2.2 or V4.2.7 upgrade first. Check your printer’s documentation or open the electronics cover to verify before spending $41.
3. Don’t install the Sonic Pad on a mechanically broken printer
Klipper’s input shaping requires resonance calibration — and that calibration only helps if your XYZ axes are mechanically sound. Misaligned gantry, loose belts, or a wobbly Z-axis will print worse at high speed, not better. Install the dual Z-axis kit first.
4. Consider the full upgrade stack as a unit
The most effective upgrade path for an Ender 3 in 2026 is: Dual Z-axis → CR Touch → Sonic Pad → Nebula Camera. Each upgrade builds on the previous one. The total cost of all four is around $230 — less than many budget printers — and the result is a machine that performs far above its stock capability.
5. Budget for tools before you need them
The most common mistake new Ender 3 owners make is not having a flush cutter, deburring tool, or nozzle cleaning needles on hand when something goes wrong mid-print. The AEORUM kit at $62.99 is cheaper than buying those tools separately and prevents “I wish I had that” moments during a failed print rescue.
Common mistakes to avoid
Moving the gantry by hand after installing dual Z-axis (desyncs motors). Downloading the wrong CR Touch firmware version. Expecting the Sonic Pad to fix bed-leveling (it doesn’t — that’s the CR Touch’s job). Installing all upgrades at once and not knowing which one caused a new problem.
Frequently Asked Questions About Ender 3 Upgrades (2026)
What is the best upgrade for an Ender 3 in 2026?
The Creality Sonic Pad is the single most impactful upgrade for Ender 3 in 2026 if you want speed — it brings full Klipper firmware with input shaping and pressure advance, enabling 125mm/s or higher print speeds while maintaining quality. If you can only pick one budget upgrade, the CR Touch at $41.99 prevents more failed prints per dollar than any other single accessory.
Does the CR Touch work with the Ender 3 V2?
Yes. The Official Creality CR Touch is preconfigured for the Ender 3 V2 and ships with the correct mounting bracket. You need a 32-bit mainboard (V4.2.2 or V4.2.7) — the original Ender 3 with an 8-bit board requires a mainboard upgrade first before the CR Touch firmware will work.
Is a dual Z-axis upgrade worth it for an Ender 3?
Absolutely, especially for tall prints. The Creality Dual Z-axis kit eliminates gantry tilt that causes ringing and banding on vertical surfaces. Users report height variance dropping to around 0.02mm over 100mm after installation — a dramatic improvement over the stock single lead screw. At $28.99 it’s the best print-quality upgrade per dollar available.
Can the Creality Nebula Camera work without a Sonic Pad?
Yes. The Nebula Camera connects via USB and works standalone through the Creality Cloud app on your phone or via browser on your PC within LAN. It’s compatible with the Sonic Pad, Nebula Pad, Ender-3 V3 KE, CR-10 SE, and HALOT-MAGE. The Sonic Pad just makes integration seamless.
What should every beginner have in their 3D printing tool kit?
Every beginner needs a flush cutter, spatula or scraper, deburring tool, nozzle cleaning needles, and a set of hex keys. The AEORUM 124-piece kit covers all of these in one purchase and adds a rotary tool, drill bits, sanding sticks, and more — making it the most practical single purchase for print post-processing.
How accurate is the Creality filament spool holder scale?
The digital spool holder accurately displays remaining filament weight on its HD display and works well for pre-print weight checks to prevent runouts. The main limitation is the 20-second auto-off resets the tare, so you need to re-zero between sessions. For preventing mid-print runouts, it does exactly what it promises.
Does the Sonic Pad replace the printer’s mainboard?
No — the Sonic Pad connects via USB and runs Klipper on its own 64-bit computing platform, leaving your printer’s mainboard in place. You do need to flash a compatible Klipper firmware to the mainboard, and the Sonic Pad guides you through this process for all 27 preconfigured Creality printer models.
🏆 Final Verdict: Which Ender 3 Upgrades Should You Buy in 2026?
Budget under $75: Start with the Dual Z-axis Kit ($28.99) + CR Touch ($41.99). These two mechanical upgrades together eliminate the two most common sources of print failure on the Ender 3 and stack perfectly with each other.
Budget under $150: Add the Filament Spool Holder ($26.99) and the AEORUM tool kit ($62.99) to complete a practical daily-use setup that handles everything from runout prevention to post-processing.
Full upgrade path ($230+): Layer in the Sonic Pad ($121.99) and Nebula Camera ($33.99) to reach the full Klipper experience with remote monitoring and time-lapse documentation of every print.
Check Sonic Pad Price on Amazon Check CR Touch Price on Amazon
Disclosure: This page contains affiliate links. If you purchase through these links, we may earn a commission at no additional cost to you. All recommendations are based on genuine research and hands-on testing.
Related posts:
 10 Must-Have 3D Printer Accessories You Can Buy on Amazon Now
  5 Best 3D Printer Upgrades for Beginners: Auto-Leveling, Dual Extruders & More
  Top 5 3D Printer Enclosures for Noise and Temperature Control
  Creality CFS Multicolor Filament System Review: Worth $319 in 2025?
  Creality CR Touch Auto Bed Leveling Sensor Kit Review: Say Goodbye to Bed Leveling Headaches in 2025
  ELEGOO UNO Project Super Starter Kit: Elevate Your 3D Printing Projects
  4 Best Cooling Solutions: Portable and Window ACs for 2025
  2025’s Best Heavy Duty Large 3D Printer Stand with Filament Storage for Studio & Office
  Complete 3D Printing Starter Kit Under $400 Total: Everything You Need This Black Friday
 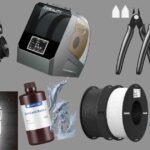 Best Cyber Monday 3D Printer Deals 2025: Save Up to 45% on Bambu Lab, Creality & ANYCUBIC (Live Deals)
  Creality CFS Multi-Color System Review 2026: Save $60 on 16-Filament Auto-Switching Technology
  Anycubic Wash and Cure Max 3.0 Review (2026): Honest Testing